Shop by CategoryAll 431 products →
A step-by-step guide to making sausages from scratch. Covers equipment, meat selection, seasoning ratios, casing preparation, stuffing technique, and cooking methods.
Once you've made your own sausages, you'll never go back to supermarket ones.
There's something genuinely satisfying about crafting your own snags—no fillers, no mystery ingredients, just quality meat, casings, and seasoning. You control exactly what goes in, which means no gum, no binders, no rubbish. The result? Sausages with real snap, real flavour, and the kind of texture you can actually feel proud of.
The good news: it's not as hard as you think. If you can mince meat and tie a knot, you can make sausages. Whether you're planning a backyard BBQ or just want to impress your mates with homemade product, this guide walks you through it step by step.
Let's get started.
Before you commit to your first batch, make sure you've got the essentials:
That's it. Not much, right?
The meat is 80% of the battle. Get it right, and you're halfway there.
Pork is the classic choice and for good reason. Pork shoulder (Boston butt) has the perfect ratio of meat to fat—usually sitting around 70/30 or 80/20. That fat is essential; it gives you flavour, helps the sausage cook evenly, and prevents it from drying out. Without enough fat, your sausage ends up dense and sad.
Beef sausages work too, but beef is leaner than pork, so you'll need to add some pork fat or ask your butcher to grind it with extra fat included. Aim for that same 70/30 ratio.
Lamb sausages are less common at home, but if you're keen, lamb shoulder works similarly to pork.
Check the fat content on the label. If it's under 25% fat, it's too lean. Aim for 25–30% for the best result.
| Product | Price | Notes |
|---|---|---|
| Otway Pork Boston Butt | $17.99/kg | Classic choice, consistent quality |
| Pork Collar Butts | $19.99/kg | Slightly more marbling, great flavour |
This is where sausages get their shape, snap, and personality.
Natural hog casings are the real deal. They're made from pork intestines (yes, really), and they give you that satisfying crack when you bite into a sausage. They're traditional, authentic, and any serious sausage maker uses them. Downside: they need rinsing, they're a bit fiddly at first, and they won't last forever once you open the pack. Upside: the snap is unbeatable.
Lamb casings are thinner than hog casings, perfect for thin snags or those delicate sausages. Same natural snap as hog, just smaller diameter.
Collagen casings are synthetic and don't require rinsing. They're consistent, they stuff easily, and they work just fine. The catch: they don't give you that satisfying snap. If you want a softer bite or you're in a hurry, go collagen. Otherwise, stick with natural.
| Product | Price | Notes |
|---|---|---|
| Natural 28/32mm Thick Hog Casings | $24.95 | Best all-rounder for standard sausages |
| Natural 24/26mm Thin Lamb Casings | $34.95 | For thin sausages, delicate flavours |
| Collagen Casing 30mm 2-Pack | $16.95 | Convenient, no snap, quick to stuff |
| Bush Tucker Range 3-pack | $34.95 | Mixed casings, good for experimenting |
Prep your casings: If using natural casings, rinse them under cold water inside and out. Leave them in a bowl of cool water for 30 minutes before stuffing—they'll soften up and become more pliable. You don't need to do this for collagen.
Seasoning is where your sausage gets personality. You can go simple (salt, pepper, maybe garlic) or get fancy with regional blends.
The smartest move? Use a pre-made sausage seasoning blend. You get consistency, balanced flavour, and none of the guesswork. Just add the recommended amount to your ground meat and mix.
All our recommended seasonings are gluten-free and designed for consistency across batches:
| Product | Price | Per Batch |
|---|---|---|
| BBQ Sausage Seasoning 875g | $14.95 | Makes ~10 batches |
| Herb and Garlic 875g | $14.95 | Classic and versatile |
| Beef Bacon and Tomato 875g | $14.95 | Great for beef sausages |
| German Bratwurst 400g | $14.95 | Traditional, slightly sweet |
| Cracked Pepper and Worcestershire 1kg | $16.95 | Australian classic |
Follow the mixing ratio on the packet—usually around 10–15 grams per kilogram of meat. Don't overdo it; you can always add more, but you can't take it out.
Now for the fun bit.
Cut your meat into cubes roughly the size of dice. Spread them on a tray and pop it in the freezer for 20–30 minutes. You want the meat cold (not frozen solid, just cold) when it goes through the grinder. Cold meat grinds more cleanly and gives a better texture.
While that's happening, assemble your mincer and sausage stuffer. Make sure both are cold—pop them in the freezer for 15 minutes if you can.
Run your meat through the coarse grinding plate. If you're using a butcher, this is where you hand it over. They should coarse-grind it for you, which is fine.
Spread the ground meat on a tray and chill it again for 10 minutes.
Place your ground meat in a large bowl. Add your seasoning according to the packet instructions. Add a small splash of ice water (maybe 50ml for a 2kg batch)—this helps everything mix and keeps the meat moist during stuffing.
Mix it thoroughly with your hands or a large spoon. You're looking for an even distribution of seasoning and a slightly sticky texture. Don't overwork it—just make sure everything's combined.
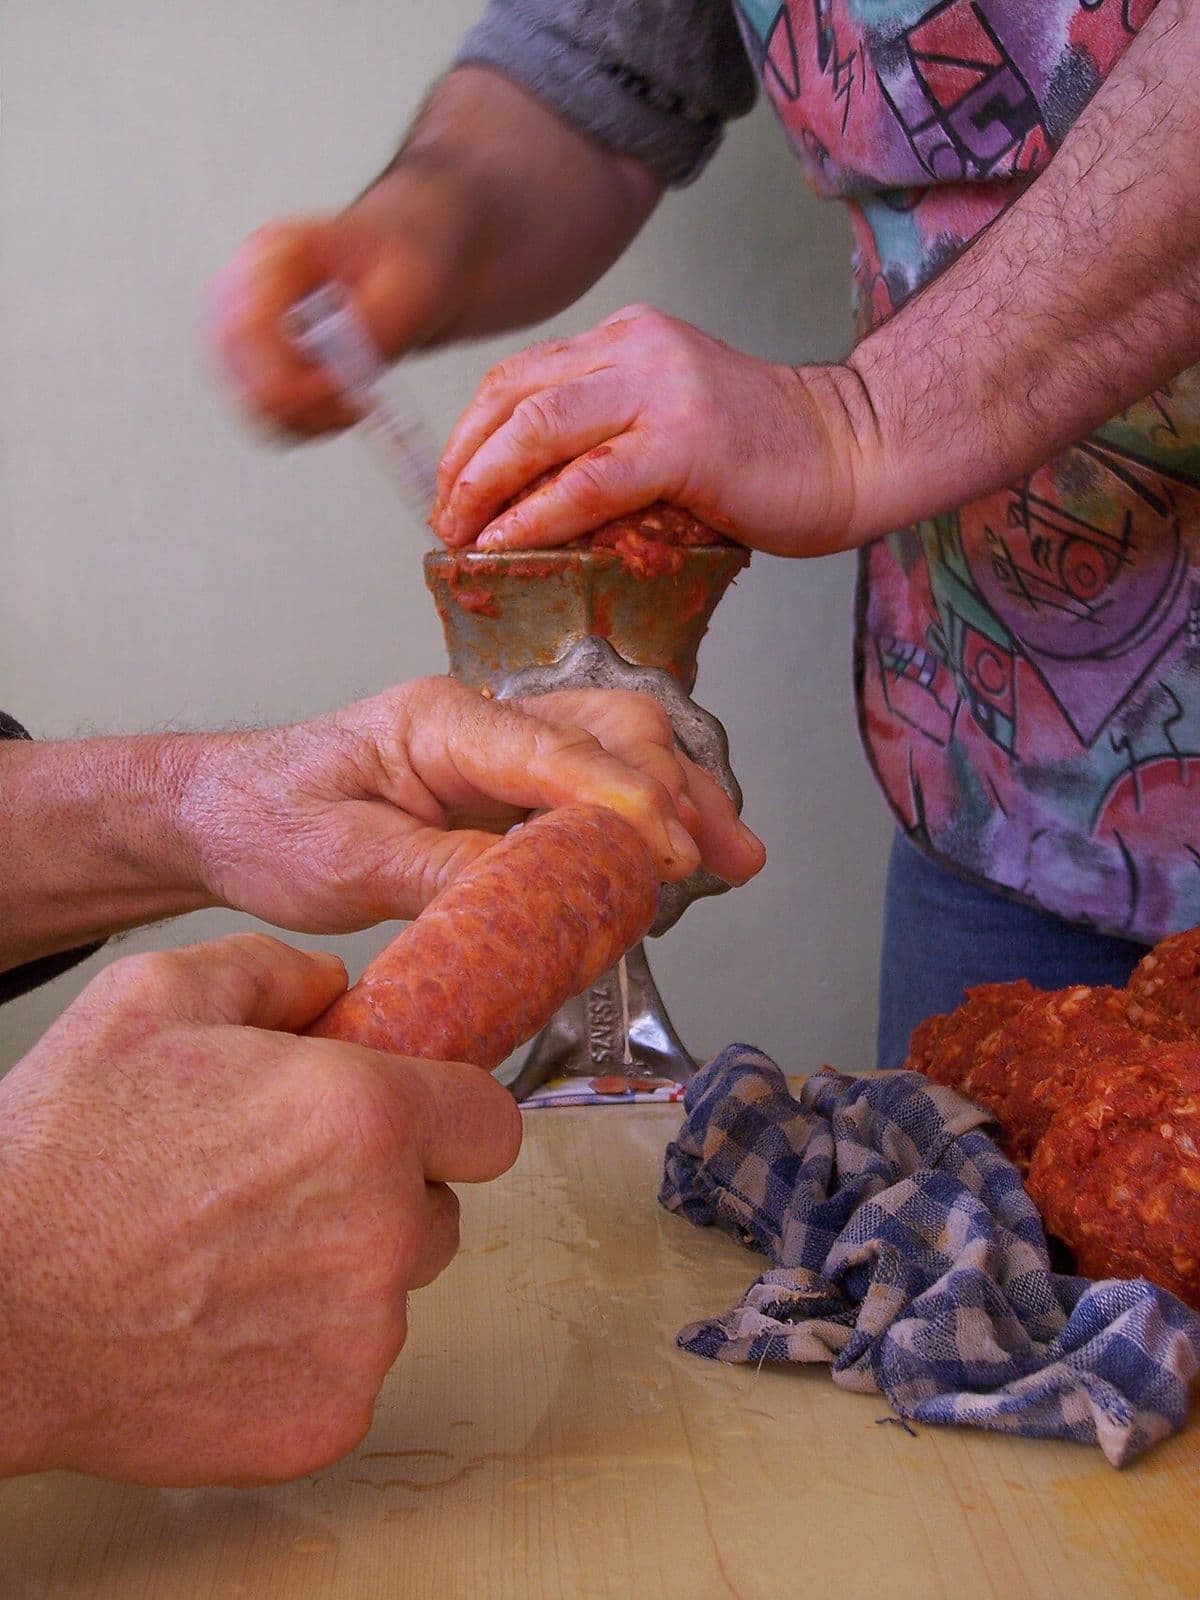
Thread your casing onto the stuffing tube. Fill your stuffer with the meat mixture. Slowly push the meat through, guiding the casing onto the tube with your free hand. You want even thickness and minimal air pockets.
It's clumsy at first. That's normal. By batch two, you'll be smooth.
Once all the meat is in the casing, use your fingers to gently separate the sausage into individual links. Pinch the casing between links and give it a half-twist. Links should be roughly 10–15cm long—whatever you prefer.
Don't poke holes to release air. Natural casings need to stay intact.
Lay your fresh sausages on a tray lined with baking paper. Cover loosely with plastic wrap and pop them in the fridge overnight. This resting period lets the flavours develop and the casing firm up.
If you can't wait overnight, at least 2 hours in the fridge is better than nothing.
Alright, it's time to cook them.
On the BBQ: This is where sausages shine. Set up indirect heat (one side hot, one side cooler) and cook your sausages on the cool side for 15–20 minutes, turning occasionally. You want a gentle cook, not a blister. If your BBQ's got a lid, use it—it keeps the heat gentle and even.
In a pan: Medium heat, a touch of oil, and turn them every few minutes. Takes about 12–15 minutes. Same principle as the BBQ: low and slow wins.
Never prick natural casings. The casing's there to keep the moisture in. If you puncture it, you lose the benefits.
Target internal temperature: 75°C. Use a meat thermometer if you want to be exact. If you're guessing, cook until there's no pink inside and the juices run clear.
Once they're cooked, let them rest on a plate for 2–3 minutes before serving. They'll be hot; let them calm down a bit.
You've made sausages. Real ones. The kind that taste like something, made from ingredients you trust.
Once you've nailed the basic process, start experimenting—different seasonings, different meat blends, different casings. Apple and sage. Chilli and garlic. Beef and bourbon. The possibilities are endless, and the best part is you control every ingredient.
Shop Sausage Seasonings — Find the flavour that suits your style.
Shop Sausage Casings — Natural hog, lamb, or collagen. Your choice.
Master the Perfect Pulled Pork — Using the same pork butt cut, learn to smoke pulled pork for your next BBQ.
Happy cooking. Your mates are going to be impressed.
Last updated: March 2026